Exercise 2 - Adding data and specifying contracts
Goal
The goal of this exercise is to continue the leave request process implementation by:
- Setting up a Business Data Model (BDM)
- Specifying contracts for the case instantiation and human tasks
Once completed, the process will be executable with automatically generated forms.
⚠ It is mandatory to strictly observe the case and syntax of the technical names provided in the instructions. Failing to do so will result in errors.
Instructions overview
Duplicate the process diagram from the previous exercise to create a 2.0.0 version
Create a LeaveRequest business object (this is a technical name so it should not contain spaces or special characters) with the following attributes (don't use the Multiple option):
| Name | Type | Multiple | Mandatory |
|---|---|---|---|
| requestorId | Long |
◻ | ☑ |
| leaveStart | Date only |
◻ | ☑ |
| dayCount | Integer |
◻ | ☑ |
| isApproved | Boolean |
◻ | ◻ |
Declare a business variable request of type LeaveRequest on your pool.
Using the Studio assistant (i.e.: Add from data...), generate the case instantiation contract, as well as the initialization script, from the request data with the following mandatory attributes:
- leaveStart
- dayCount
Initialize the request business variable using the auto-generation provided by the contract creation.
Add a step contract on the Validate request task use the Studio assistant with the following attribute:
- isApproved
Step by step instructions
-
Duplicate the process diagram from the previous exercise to create a 2.0.0 version:
- In the project explorer, right click on the diagram and Duplicate
- Update the process diagram AND pool version numbers
-
Create the LeaveRequest BDM:
- Click on the icon project overview
 . Click on Create in the Business Data Model section.
The Business Data Model editor opens.
. Click on Create in the Business Data Model section.
The Business Data Model editor opens. - Rename the default initialized object BusinessObject in the list of business objects to LeaveRequest (A) (this is a technical name so spaces, accents and other special characters should be omitted)
- After LeaveRequest object is selected, add the following attributes (B) :
Name Type Multiple Mandatory requestorId Long◻ ☑ leaveStart Date only◻ ☑ dayCount Integer◻ ☑ isApproved Boolean◻ ◻ 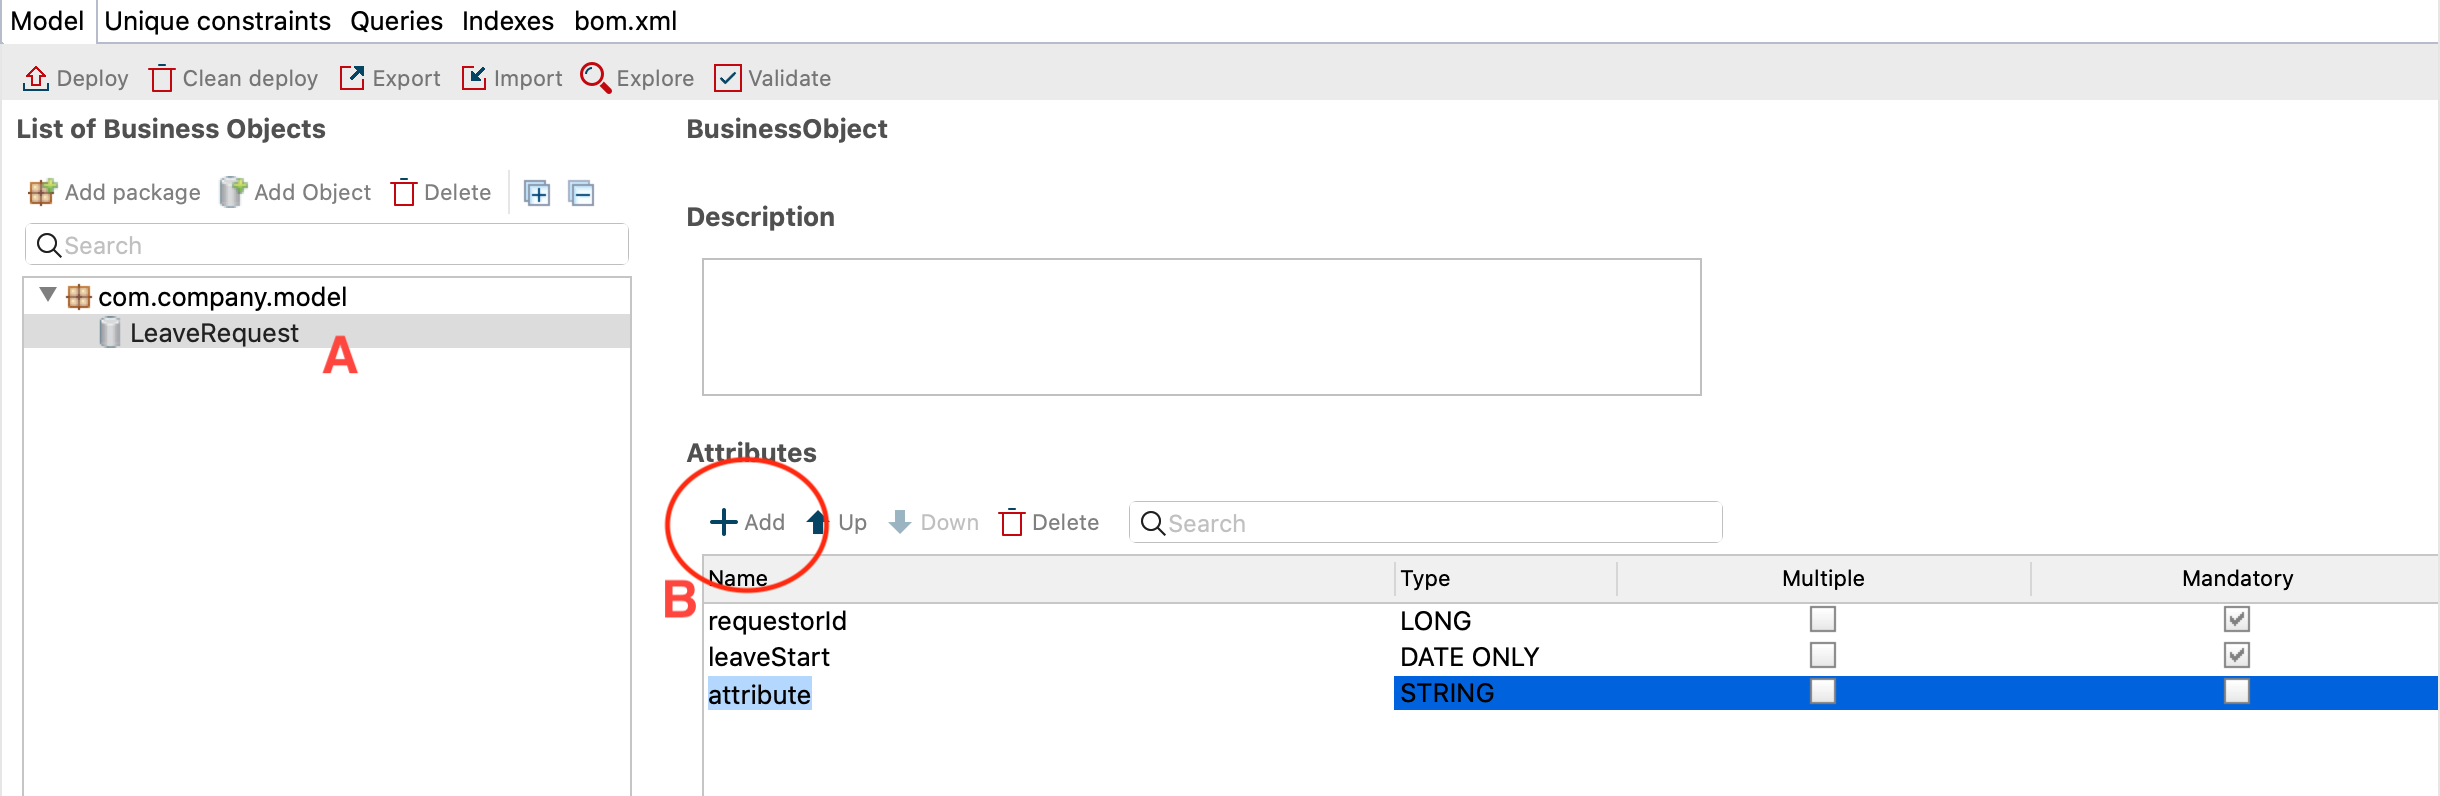
- Save. The following message is displayed to indicate that the BDM must be deployed

- Clic on the button
 in the BDM editor to deploy it.
You should be displayed with the following message that confirm the deployment of the BDM:
in the BDM editor to deploy it.
You should be displayed with the following message that confirm the deployment of the BDM:
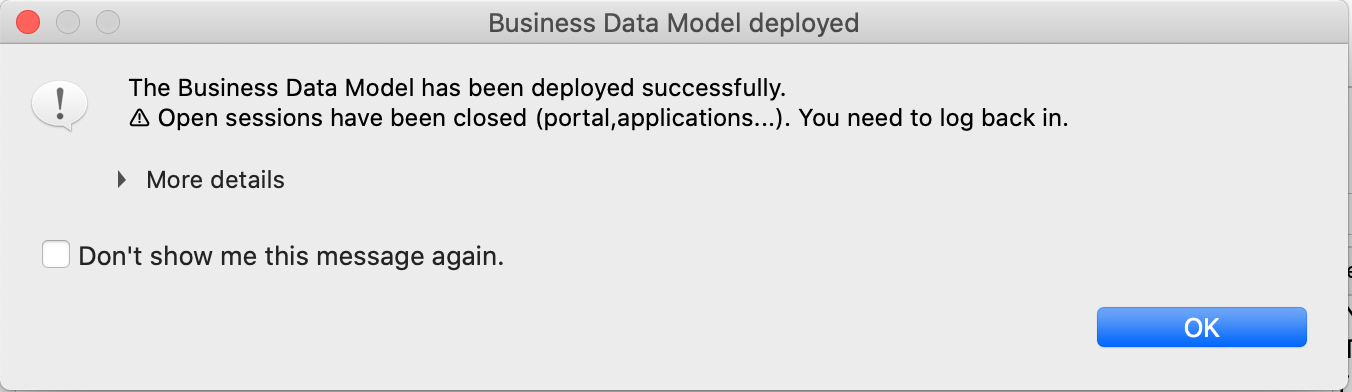
- Check the box Don't show me this message again
- Click on Ok
- Click on the icon project overview
-
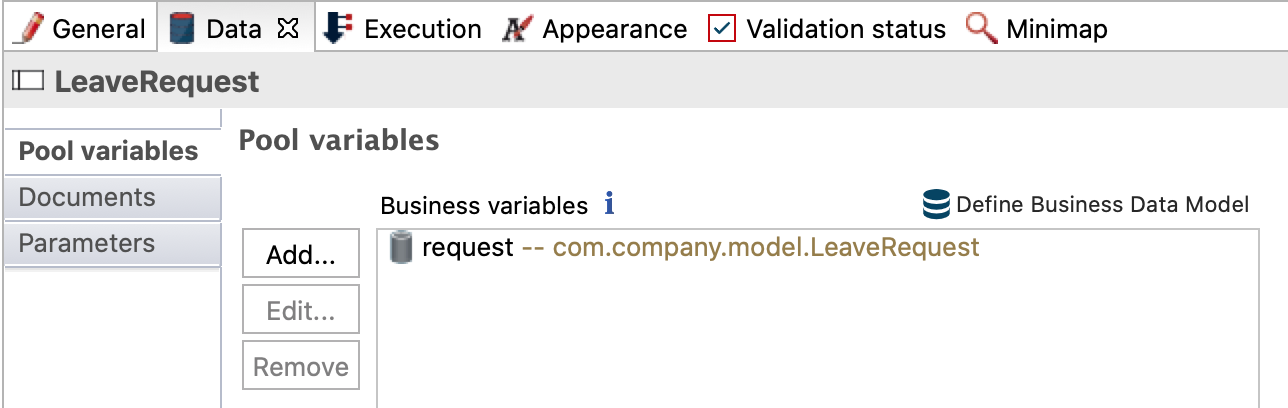
Declare a business variable of type LeaveRequest on your process:
- Select the process pool
- Navigate to the Data / Pool variables tab
- In the Business variables section, click on Add...
- Name the variable request and select the com.company.model.LeaveRequest business object
- Click on Finish
-
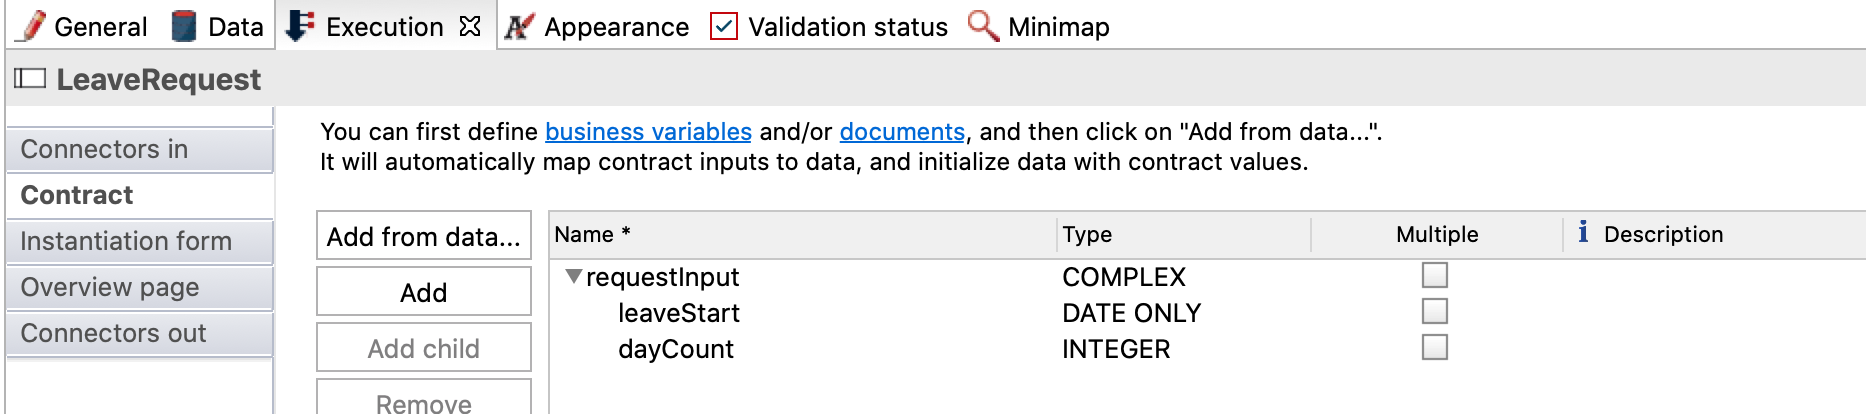
Set up the case instantiation contract:
- Select the process pool
- Navigate to the Execution / Contract / Inputs tab
- Click on Add from data...
- Select the request business data
- Keep the default input name requestInput
- Click on Next
- Uncheck the requestorId and isApproved attributes
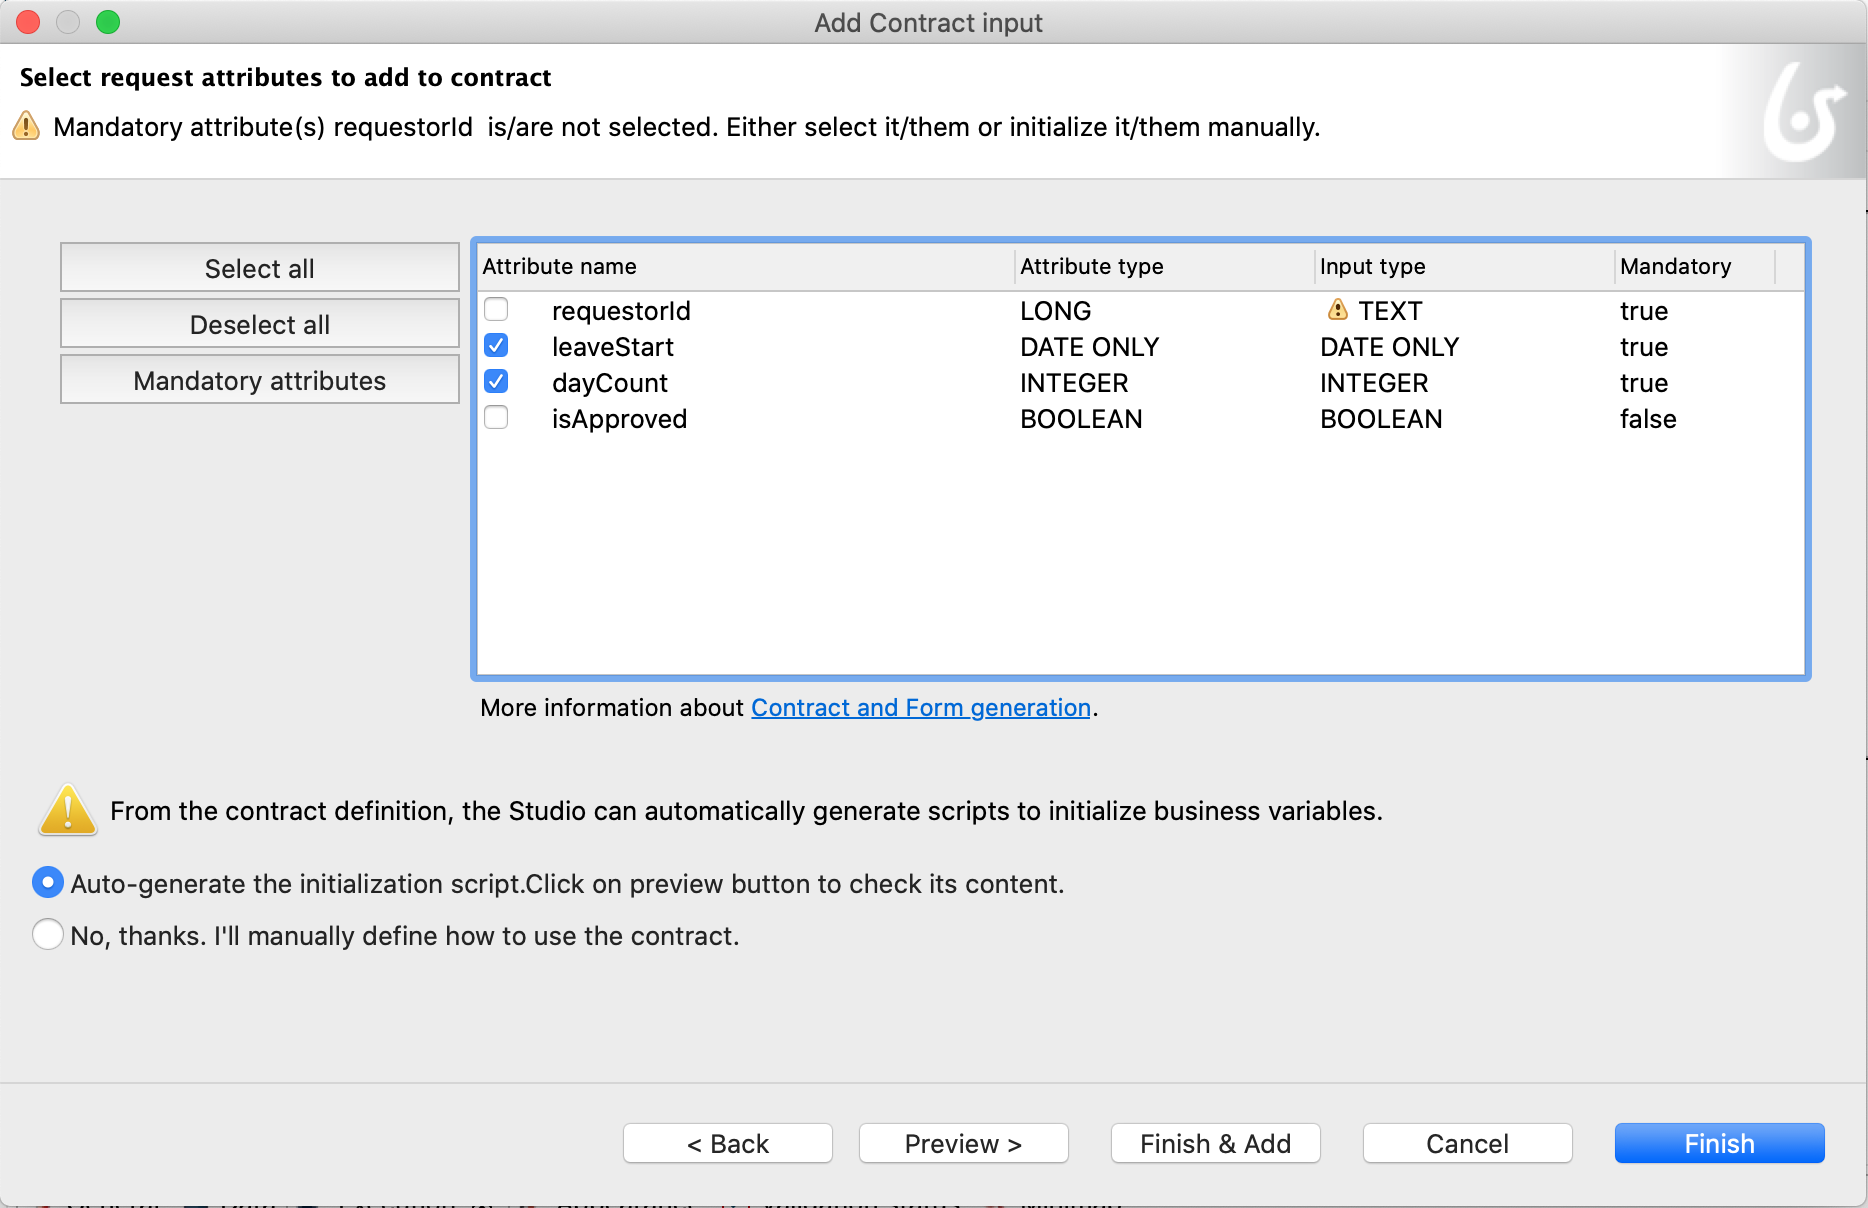
- Click on Finish (not on Finish & Add) and dismiss the warning message about the incomplete initialization of the business variable
-
Update the request business variable initialization to be able to retrieve the requestor id of the new request:
- Select the process pool, and navigate to the Data / Pool variables tab
- Select the request business variable
- Click on Edit...
- Click on the pencil icon next to the Default value field to open the expression editor. The script has been initialized.
- In the left menu, select Code Templates/Bonita Users (A) and drag the processInitiatorUser template before the last line starting with `return The script to retrieve the process instance and the initiator is created automatically.
- Enter
leaveRequestVar.requestorId = processInitiator.idto retrieve the instance initiator Id in the requestorId attribute (B).
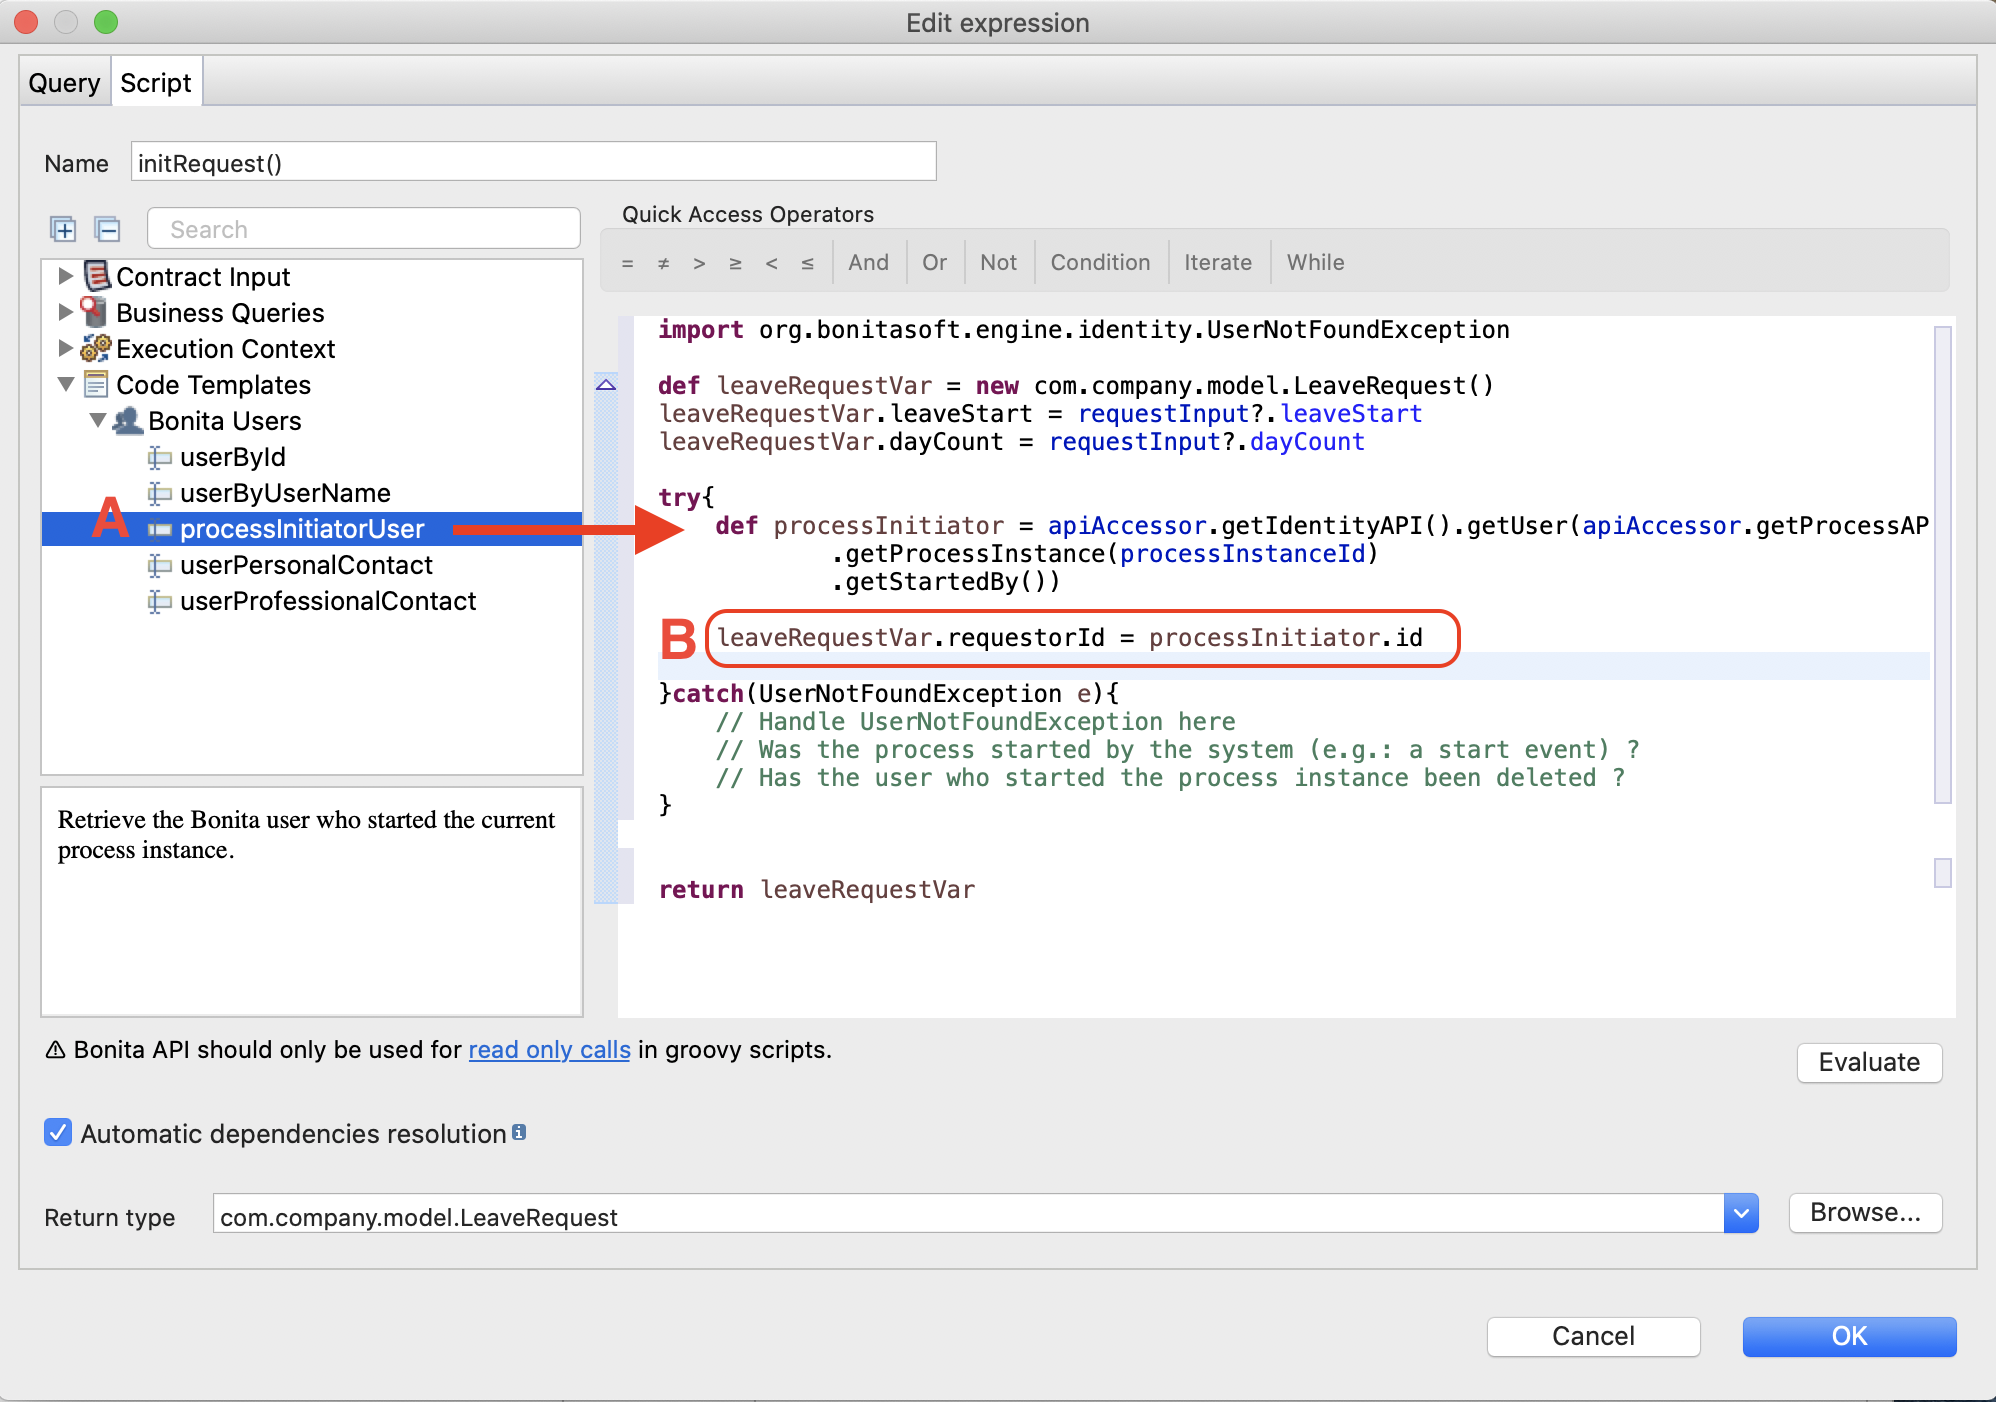
The script will initialize the business variable using the contract data and the requestor id.
The
tryandcatchtags are initialized for script validation. It is possible to remove them.- Click on the OK button to close the expression editor.
- Click again on the OK button to validate the modification of the business variable.
-
Set up the Validate request step contract
- Select the Validate request task
- Navigate to the Execution / Contract / Inputs tab
- Click on Add from data...
- Select the request business data, keep the default input name requestInput
- Click on Next
- Check only the isApproved attribute
- Click on Finish (not on Finish & Add) and dismiss the warning message about the incomplete initialization of the business variable
-
Note that an operation (Execution / Operations) on Validate request task to update the request has been automatically generated:

-
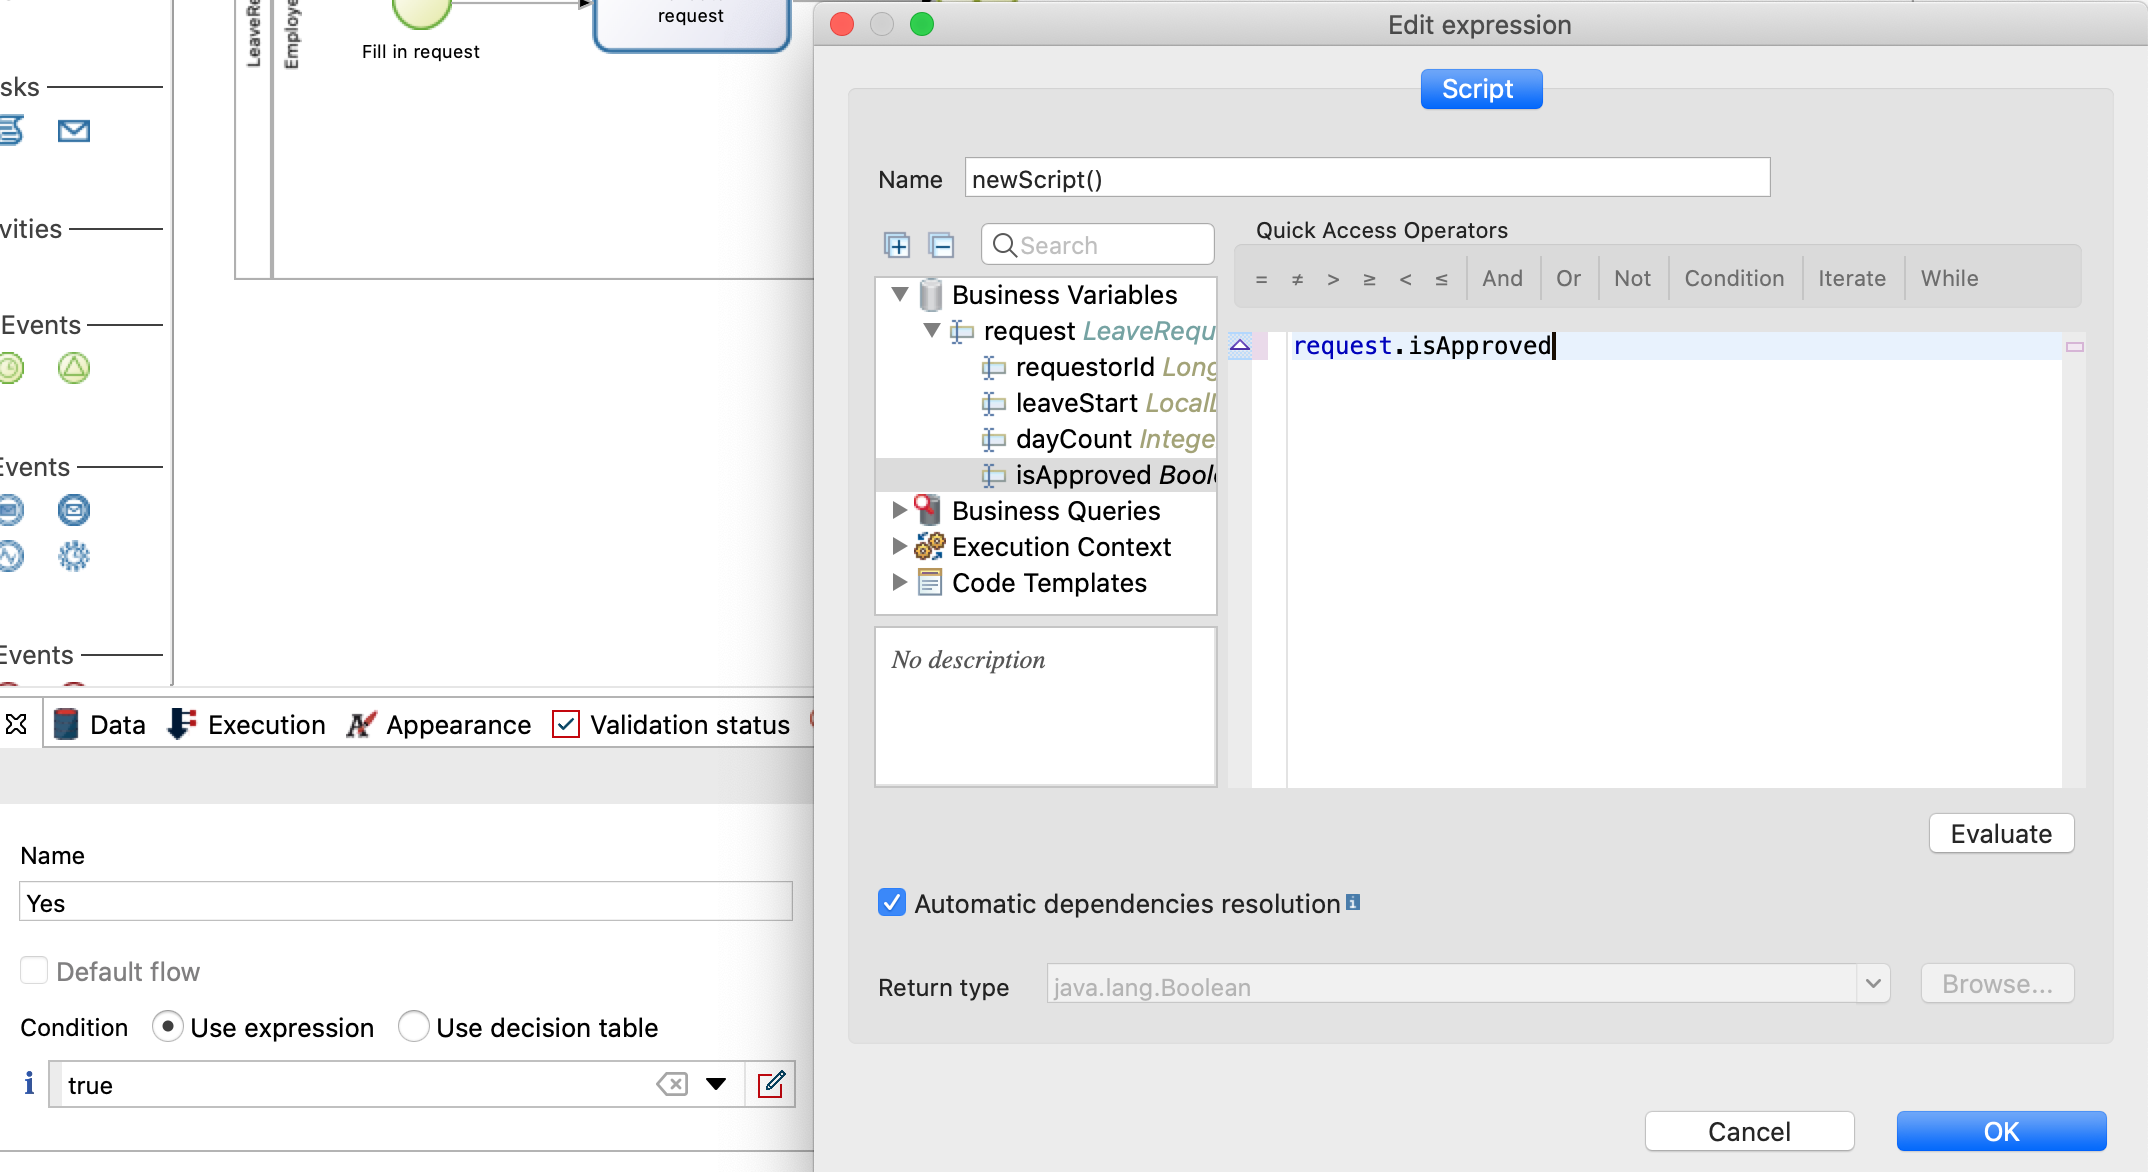
Use the business data to dynamically control the process flow by configuring the Yes transition condition to use isApproved attribute value:
- Select the transition Yes
- Navigate to the General / General tab
- Click on the pencil icon next to the Condition drop-down to open the expression editor
- In the expression editor, select Business Variables/isApproved and drag it to the whiteboard to replace
true
-
Save the process:
- Click on the Save button from the Studio's top menu bar
-
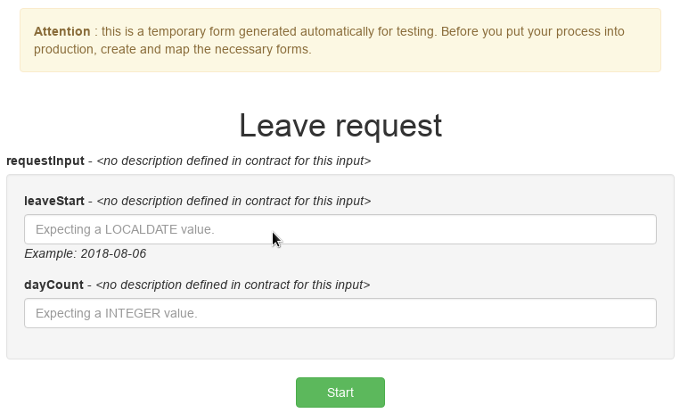
Run the process to test your contract constraints:
- Run the process and use the automatically generated forms to test your constraints
ℹnformation :
- For the leaveStart input, enter a date in the YYYY-MM-DD format
- For the isApproved input, enter a boolean value: either
trueorfalse